This is an old revision of the document!
EmulationStation
Gamers who are emulator fans tend to come across the same problem over and over again. How do you organize the hundreds of emulators and thousands of ROMs on your disks? This ends up being a mundane task especially when you consider all of the different formats and methods of sorting data involved. In an attempt to solve this problem, and avoid your emulators from getting too messy, EmulationStation (abbreviated as ES) puts everything in one place. It’s a front-end with one of the best interfaces out there today. Even though the process of setting things up can be tedious, the results are very well worth it.

Menu Usage
EmulationStation has several common functions mapped to certain buttons. As everyone uses different controllers and often times remap them, we usually refer to the four action buttons as North/East/South/West. These are represented graphically as ![]() /
/![]() /
/![]() /
/![]() . You can see some common ES functions and how they map to the PlayStation, Xbox and SNES controllers in the tables below.
. You can see some common ES functions and how they map to the PlayStation, Xbox and SNES controllers in the tables below.
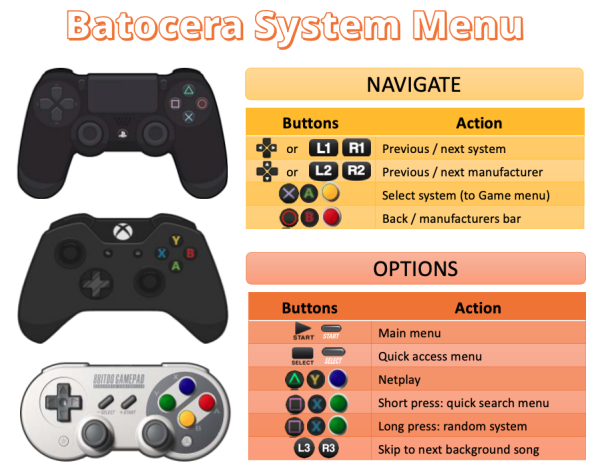

In ES's menus, the South button ![]() (Enter on keyboard) is to confirm and the East button
(Enter on keyboard) is to confirm and the East button ![]() (Esc on keyboard) is to cancel, following the standard Western (Xbox/PS3 in US) orientation. You can swap them from MAIN MENU → SYSTEM SETTINGS → DEVELOPER MENU → SWITCH A/B BUTTONS IN EMULATIONSTATION to mimic the Eastern (Nintendo/PSX in Japan) orientation instead. Just note that all instructions in this wiki will assume you are using the Western orientation.
(Esc on keyboard) is to cancel, following the standard Western (Xbox/PS3 in US) orientation. You can swap them from MAIN MENU → SYSTEM SETTINGS → DEVELOPER MENU → SWITCH A/B BUTTONS IN EMULATIONSTATION to mimic the Eastern (Nintendo/PSX in Japan) orientation instead. Just note that all instructions in this wiki will assume you are using the Western orientation.
The West button ![]() (- on keyboard) and North button
(- on keyboard) and North button ![]() (= on keyboard) are usually assigned to utility functions that differ depending on the context of the screen you are on, refer to the help prompts at the bottom of the screen to see what they do.
(= on keyboard) are usually assigned to utility functions that differ depending on the context of the screen you are on, refer to the help prompts at the bottom of the screen to see what they do.
In Batocera v30 and lower, the game options button is accessed by pressing ![]() and (in v30 only) the save state manager is accessed by holding
and (in v30 only) the save state manager is accessed by holding ![]() . This behavior can be replicated in post-v31 versions by going to DEVELOPER MENU → ACCESS GAME OPTIONS WITH NORTH BUTTON and switching it “ON”.
. This behavior can be replicated in post-v31 versions by going to DEVELOPER MENU → ACCESS GAME OPTIONS WITH NORTH BUTTON and switching it “ON”.
Press the [START] button on your controller (Spacebar on keyboard) to bring up the Main Menu of EmulationStation (from any list).
If you press [SELECT] button (Backspace on keyboard) the menu popping up will be different depending on if you are in the Main/System Menu or the Game List. This can be a quick way to get to your Per System Advanced Settings for that system.
| Start Button in Main Menu and Game List | Select Button in Main Menu | Select Button in Game List |
|---|---|---|
 |  |  |
New to Batocera 5.27: You can press ![]() on the system list to access the system manufacturer bar.
on the system list to access the system manufacturer bar.

File manager and Applications menu
Batocera has a simple built-in file manager called PCManFM. It can be accessed by pressing [F1] on your keyboard on the main EmulationStation menu. This is only available on x86/x86_64 builds.

If you want to configure certain emulators for systems like Wii U, PlayStation 2 or PlayStation 3 you can find the emulator settings by opening Applications in the sidebar. Keep in mind that any settings set in EmulationStation's Per System Advanced Settings will overwrite any applicable configuration you've made here when launched!

If you end up deleting files through this interface, they will be moved to the trash by default. You can override this behavior by holding down the [Shift]+[Del] keys instead of just [Del], or alternatively configure the file manager itself to delete by default. In case you've moved files to the trash and can't find them, the trash folder path is /userdata/system/.local/share/Trash/files.
- emulationstation_overview.1649553023.txt.gz
- Last modified: 4 years ago
- by atari