Run Batocera in a Virtual Machine
Running Batocera in a virtual machine is not officially supported, nor will it be an accurate representation of how it will behave, but it can be useful for quickly testing custom images or UI changes.
Expect massive performance deficits compared to bare-metal installation. Virtual Machines don't take kindly to newer/modern graphics APIs and standards.
Oracle VirtualBox
- Install Oracle's VirtualBox.
- Install the VirtualBox #.#.# Oracle VM VirtualBox Extension Pack too.
If you need further help with installing VirtualBox, refer to their helpful user manual
- If you downloaded the Batocera image file from the website, it is in
.img.gzformat. Uncompress the.gzpart with your favorite uncompressing tool (7-Zip, WinRar…) to make it a.imgfile. Some browsers uncompress the file you downloaded by default. - Convert the Batocera IMG file to a VDI using the command line (
[Win]+[R], then typecmd). For example, for the default VirtualBox installation using Batocera v33 beta:"C:\Program Files\Oracle\VirtualBox\VBoxManage.exe" convertdd C:\batocera-x86_64-33-20211108.img C:\batocera-x86_64-33-20211108.vdi
- Resize it to be larger, can also be done via command line. For example, to create an image that's 20GB in physical size:
"C:\Program Files\Oracle\VirtualBox\VBoxManage.exe" modifyhd "C:\batocera-x86_64-33-20211108.vdi” --resize 20000
- Run VirtualBox proper and create a new VM and select “Expert Mode”.
- Set the type “Microsoft Windows” and version to “Windows 7 (64bits)”; (It's just a label for predefined setup, maybe linux or oracle will be better for you, but try this one first)
- Set available RAM to at least 2GB (2048MB);
- Use the Batocera VDI file created earlier:

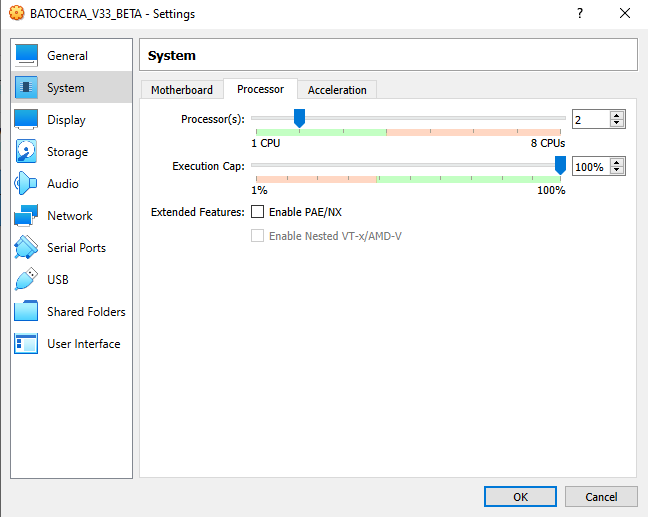
- Once the VM has been created, adjust its settings like so:
- Processor: Processors: “2”. A higher setting might provide better performance, but try to stay within the green range for your computer. For host computers that only have two cores, use “1” here. Execution Cap: 100%.
- Display: Acceleration: Tick “Enable 3D Acceleration”. Video Memory: As high as you can go, “256MB” works fine.

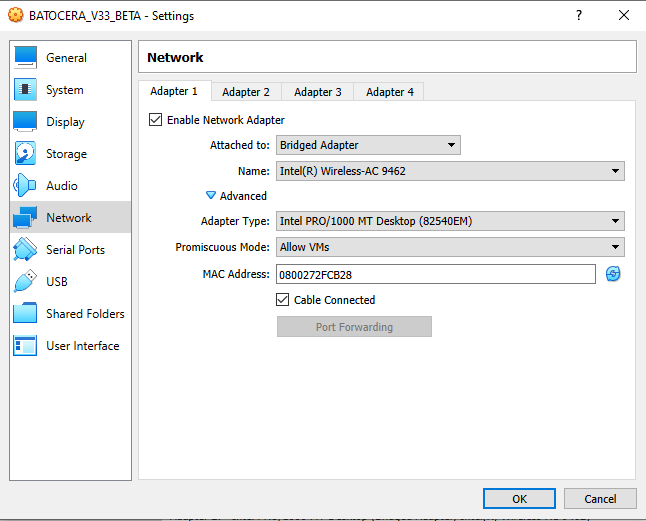
- Network: Adapter 02: Tick “Enable Network”. Attached to: “Bridge Adapter”. Promiscuous mode: “Allow VMs”
- USB: Add desired devices (such as controllers, Bluetooth dongles, etc.) to the list:

Peripherals that the VM automatically forwards through such as mouse, keyboard and network cards are not necessary to add here.
- If AUTO Audio and AUTO Video didn't work, change the following settings within Batocera:
- SYSTEM SETTINGS → VIDEO OUTPUT to “VIRTUAL-1”,
- AUDIO OUTPUT to “ALSA_OUTPUT_PCI.STEREO” and
- AUDIO PROFILE to “PRO_AUDIO”.

If those settings don't produce audio, keep trying all permutations of AUDIO PROFILE and AUDIO OUTPUT until you find one that does. Remember to exit the menu each time to test the change!

And we're done.

Post-installation setup
You can increase the output resolution releasing your cursor (right [Ctrl]) and clicking VIEW → VIRTUAL SCREEN-1 in the menu toolbar of VirtualBox.

You can still add files to Batocera using the usual methods, even the network share.
As you already have the image .vdi, you can setup different environments for the same machine and test which one will be better for your PC, just make sure you are using a 64-bit one (or 32-bit if appropriate).

Qemu
Method 1
- Download the image for Batocera from the main site.
- Download the following script and mark it as executable: https://raw.githubusercontent.com/batocera-linux/batocera.linux/master/scripts/linux/runQemu.sh
- Create an empty “share” image containing the partition Batocera will use for its userdata and name it
share.img(replacing5Gwith the size you desire, make it at least 5GB to support future upgrades):dd if=/dev/zero of=share.img count=5 bs=5G
To confirm that the blank share image has been created, run
ls -lh share.img
to check its reported space. For instance, a 5GB blank image should report back something like:
-rw-rw-r-- 1 XXX XXX 5.0G XXX share.img
- Optionally, if you don't want to use Batocera itself to format the partition, create the filesystem manually with something such as:
mkfs.ext4 share.img
Otherwise it's fine to, after booting Batocera, go to SYSTEM SETTINGS → DEVELOPER → FORMAT A DISK and format it there.
- Optionally, forward a gamepad connected to the host computer by running the following:
udevadm info -q all -n /dev/bus/usb/001/002
echo 'SUBSYSTEM=="usb", ENV{ID_MODEL}=="Usb_Gamepad", MODE="0666"' >> /etc/udev/rules.d/99-joysticks-rw.rules
- Then run the following to start up the Qemu virtual machine:
./runQemu.sh ~/batocera-x86_64-XX-XXXXXXXX.img share.img

The runQemu.sh script itself contains further instructions (that may get updated faster than this wiki). For an example of what an ordinary installation procedure might look like:

A video demonstration of Batocera being run inside a Qemu VM.
Post-installation setup
You can still add files to Batocera using the usual methods, even the network share.
In case you'd like to mount the share image to add files directly, run the following:
X=$(sudo losetup -f)
mkdir -p BATOCERA
sudo losetup -P $X share.img
sudo mount ${X}p1 BATOCERA
sudo chmod -R 777 BATOCERA/
Then it should be automatically detected and mounted by your desktop environment.
Method 2
- Download the compressed Batocera image for x86_64 from the main site and extract the
batocera*.imgfile from the compressedbatocera*.img.tztarball. - Expand the image to the size you'd like to assign to Batocera using
fallocate. At least 16 GB is recommended for full functionality, but if space is a concern then you can get away with just 7 GB:sudo fallocate -l 7G batocera.img
- Install the
virt-managerandqemupackages for your distro:- On Debian/Ubuntu:
apt-get update
apt-get upgrade
apt-get install virt-manager qemu
- On Fedora/RPM-based: Update your package lists, then:
sudo dnf install virt-manager qemu
- On Arch/pacman-based: Update your package lists, then:
pacman -S virt-manager qemu - On Yum-based: Update your package lists, then:
yum install virt-manager qemu
- Make sure your user owns the
libvirtsocket. Change out the username:username with your actual username:sudo chown username:username /var/run/libvirt/libvirt-sock
- Create a VM with the Batocera image as a drive in Qemu.
- Go to File → New virtual machine…

- Ensure “Import an existing disk image” is selected.

- “Browse” for an existing image.

- Click “Browse for local…” and select the Batocera image file.


- Select the OS:
Microsoft Windows 10( no screenshot? What does this mean, as we've already selected our image?)
 - The dialogue box should now look like this, proceed:

- Grant access permission to the emulator to search into the selected path
- Change the default Memory and CPU numbers if you choose. The defaults are good enough.

- Give your virtual machine a name and click Finish.

- (Optional) If you'd prefer to passthrough your GPU to the virtual machine for extra performance (warning: your host machine will lose access to the GPU you passthrough) follow the instructions here: https://www.server-world.info/en/note?os=Debian_11&p=kvm&f=12
- (Optional) For gamepad support:
- Connect the gamepad into a USB port on the host computer.
- On the virtual machine, go to View → Redirect USB Devices and then select the connected gamepad.

- (Optional) For external storage device support:
- Connect the USB external disk into a USB port on the host computer.
- On the virtual machine, go to View → Redirect USB Devices and then select the connected USB disk device.

- Now goes to Settings → Storage Devices → And select the USB Disk, system will reboot to apply the changes.
- Enjoy!


Proxmox
Untested. Reportedly, following this tutorial to set it up in addition to passing through all devices enables it to work: https://www.nicksherlock.com/2020/12/running-tails-as-a-vm-with-persistence-on-proxmox/
Troubleshooting
I have a black screen but can still hear the audio playing
The virtual machine is not configured correctly. Preferably, you would figure out how it's not configured correctly and remedy that, but in case you'd rather just instantly work around it, you can force Batocera to use a particular resolution.
I have no space in my virtual userdata partition!
Perhaps you didn't expand the image before using it as the base?
It's also possible to simply replace the userdata partition with another, larger one by changing the “drives” in the virtual machine's settings. This will differ from virtual machine to virtual machine, look up its instructions. Batocera uses the ext4 filesystem for its userdata by default.
My controller isn't working!
First, make sure you have passed it through as a USB device to the VM itself (refer to the instructions above).
If it's still not working, check that the controller itself is working fine on your host machine outside of VirtualBox.
I've done that and it's still not working! I'm on a Linux-based host.
If it's still not being recognized, add the user to the correct group:
- Close VirtualBox
- Open a terminal and run
sudo usermod -a -G vboxusers $USER && sg vboxusers virtualbox
Windows shouldn't have this issue as long as the program is run in administrator mode.
I have no network connection even though my host has one
If you face an error about the “default” network device like this:

then you are not currently passing through your network connection to the virtual machine. Run the following on the host machine to enable that:
sudo virsh net-start default
- run_batocera_in_vm.txt
- Last modified: 16 months ago
- by dekay